Airflow生产环境部署
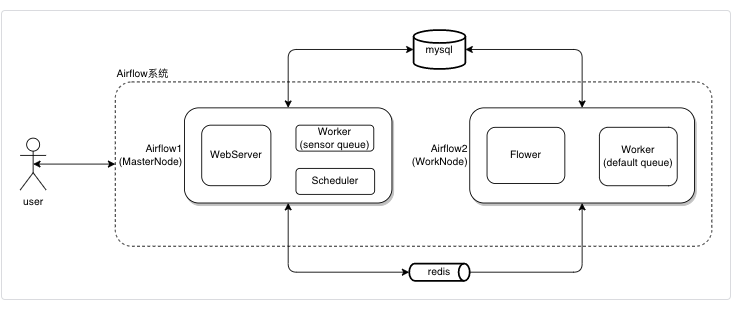
一、系统架构
架构图
二、基础环境
硬件环境
机器名称 | vCPU(核) | 内存(G) | 系统盘 | 数据盘(G) | IOPS |
|---|
Airflow1 | 16 | 32 | 500 | ----- | 上限5000 |
Airflow2 | 32 | 64 | 500 | 2048 | 上限5000 |
软件环境
名称 | 版本 |
|---|
Python | 3.9.0 |
Airflow | 2.2.4 |
MySQL | 5.7 |
Redis | 5.0 |
MRS | 3.1.0 |
三、部署流程
1. Python环境改为3.9.0
2. 安装一些基础环境
root用户下:
yum install gcc libffi-devel python3-devel openssl-devel -y
yum install gcc-c++ python-devel.x86_64 cyrus-sasl-devel.x86_64 -y
yum install mysql-devel |
|---|
3. 创建同名用户及用户组
[root@airflow1 ~]$ useradd airflow
[root@airflow1 ~]$ passwd airflow
密码: somepwd |
|---|
4. 切换到airflow账户下
[root@airflow1 ~]$ sudo su - airflow |
|---|
5. 安装airflow
6. MySQL上创建数据库
1. 在rds页面上创建airflow数据库
2. 在rds页面上创建airflow用户并授权(选择对象授权而非全局授权)
说明:
后台对应的sql是
/*COMMON SETTINGS*/
CREATE USER 'airflow'@'' IDENTIFIED BY '******';
/*OBJECT SETTINGS*/
GRANT SELECT, INSERT, UPDATE, REFERENCES, DELETE, CREATE, DROP, ALTER, INDEX, TRIGGER, CREATE VIEW, SHOW VIEW, EXECUTE, ALTER ROUTINE, CREATE ROUTINE, CREATE TEMPORARY TABLES, LOCK TABLES, EVENT, GRANT OPTION ON airflow.* TO 'airflow'@''; |
|---|
7. 配置环境变量
vim ~/.bashrc
export LD_LIBRARY_PATH=/usr/local/lib:$LD_LIBRARY_PATH
export AIRFLOW_CONFIG=/home/airflow/deploy/some-airflow/airflow.cfg
export AIRFLOW_HOME=/home/airflow/deploy/some-airflow
export PYTHONPATH=${AIRFLOW_HOME}/dags:${AIRFLOW_HOME}/dags/data/groot:$PYTHONPATH |
|---|
8. airflow.cfg文件配置
dags_folder = /home/airflow/airflow/dags
改成
dags_folder = /home/airflow/deploy/some-airflow/dags
plugins_folder = /home/airflow/airflow/plugins
改成
plugins_folder = /home/airflow/deploy/some-airflow/plugins
base_log_folder = /home/airflow/airflow/logs
改成
base_log_folder = /home/airflow/deploy/some-airflow/logs
child_process_log_directory = /home/airflow/airflow/logs/scheduler
改成
child_process_log_directory = /home/airflow/deploy/some-airflow/logs/scheduler
#dssag_processor_manager_log_location = /home/airflow/airflow/logs/dag_processor_manager/dag_processor_manager.log
改成
dssag_processor_manager_log_location = /home/airflow/deploy/some-airflow/logs/dag_processor_manager/dag_processor_manager.log
# 配置数据库,这里使用了mysql
executor = CeleryExecutor
sql_alchemy_conn = mysql://airflow:somepwd@somehost:3307/airflow?charset=utf8
result_backend = db+mysql://airflow:somepwd@somehost:3307/airflow?charset=utf8
base_url = http://somehost:8080
# 配置redsi
broker_url = redis://:somepwd@somehost:6379/0
# 设置时区
default_timezone = Asia/Shanghai
# web ui 界面使用的时区
default_ui_timezone = Asia/Shanghai
# 是否加载案例demo
load_examples = False
[smtp]
# If you want airflow to send emails on retries, failure, and you want to use
# the airflow.utils.email.send_email_smtp function, you have to configure an
# smtp server here
smtp_host = smtp.sendcloud.net
smtp_starttls = True
smtp_ssl = False
# Example: smtp_user = airflow
smtp_user = someuser
# Example: smtp_password = airflow
smtp_password = somepwd
smtp_port = 25
smtp_mail_from = airflow@mail.cn
smtp_timeout = 30
smtp_retry_limit = 5 |
|---|
9. 导入各种module
airflow用户下
pip3 install 'apache-airflow[apache.webhdfs]'
pip3 install 'apache-airflow[apache.hdfs]'
pip3 install 'apache-airflow[apache.hive]'
pip3 install 'apache-airflow[ssh]'
pip3 install 'apache-airflow[grpc]'
pip3 install 'apache-airflow[mysql]'
pip3 install 'apache-airflow[celery]'
pip3 install 'apache-airflow[redis]'
pip3 install esdk-obs-python --trusted-host pypi.org
pip3 install pymongo
pip3 install pymysql |
|---|
10. 初始化数据库
[airflow@airflow1 ~]$ airflow db init |
|---|
11. 创建ADMIN账号
[airflow@airflow1 ~]$
airflow users create \
--username admin \
--firstname first_name \
--lastname last_name \
--role Admin \
--email admin@some.com
Password:somepassword |
|---|
12. 启动服务
airflow1机器:
airflow webserver -D
airflow scheduler -n -1 -D
airflow celery worker -q sensor -D
airflow2机器:
airflow celery worker -D
airflow celery flower -D |
|---|
13. kill进程
ps -axu | grep celeryd | awk '{print $2}' | xargs kill -9
ps -axu | grep webserver | awk '{print $2}' | xargs kill -9
ps -axu | grep scheduler | awk '{print $2}' | xargs kill -9
ps -axu | grep flower | awk '{print $2}' | xargs kill -9 |
|---|
四、问题记录
报错1: No module named '_sqlite3'
File "/usr/local/python3/lib/python3.9/sqlite3/__init__.py", line 23, in <module>
from sqlite3.dbapi2 import
File "/usr/local/python3/lib/python3.9/sqlite3/dbapi2.py", line 27, in <module>
from sqlite3 import
ModuleNotFoundError: No module named 'sqlite3'
帮助文档:
https://blog.csdn.net/mx_steve/article/details/108883050?spm=1001.2101.3001.6650.1&utm_medium=distribute.pc_relevant.none-task-blog-2%7Edefault%7ECTRLIST%7ERate-1.pc_relevant_default&depth_1-utm_source=distribute.pc_relevant.none-task-blog-2%7Edefault%7ECTRLIST%7ERate-1.pc_relevant_default
https://www.jianshu.com/p/4586aa8e5524
帮助的操作:
make[1]: Leaving directory `/opt/sqlite-autoconf-3290000'
[root@airflow2 sqlite-autoconf-3290000]# /usr/local/bin/sqlite3 --version
3.29.0 2019-07-10 17:32:03 fc82b73eaac8b36950e527f12c4b5dc1e147e6f4ad2217ae43ad82882a88bfa6
[root@airflow2 sqlite-autoconf-3290000]# /usr/bin/sqlite3 --version
3.7.17 2013-05-20 00:56:22 118a3b35693b134d56ebd780123b7fd6f1497668
[root@airflow2 sqlite-autoconf-3290000]# sqlite3 --version
3.7.17 2013-05-20 00:56:22 118a3b35693b134d56ebd780123b7fd6f1497668
[root@airflow2 sqlite-autoconf-3290000]# mv /usr/bin/sqlite3 /usr/bin/sqlite3_old
[root@airflow2 sqlite-autoconf-3290000]# ln -s /usr/local/bin/sqlite3 /usr/bin/sqlite3
[root@airflow2 sqlite-autoconf-3290000]# sqlite3 --version
3.29.0 2019-07-10 17:32:03 fc82b73eaac8b36950e527f12c4b5dc1e147e6f4ad2217ae43ad82882a88bfa6
[root@airflow2 sqlite-autoconf-3290000]# vim ~/.bashrc
[root@airflow2 sqlite-autoconf-3290000]# source ~/.bashrc
[root@airflow2 sqlite-autoconf-3290000]# python3
-bash: /usr/bin/python3: No such file or directory
[root@airflow2 sqlite-autoconf-3290000]# sqlite3 --version
3.29.0 2019-07-10 17:32:03 fc82b73eaac8b36950e527f12c4b5dc1e147e6f4ad2217ae43ad82882a88bfa6
[root@airflow2 sqlite-autoconf-3290000]# /usr/bin/sqlite3 --version
3.29.0 2019-07-10 17:32:03 fc82b73eaac8b36950e527f12c4b5dc1e147e6f4ad2217ae43ad82882a88bfa6
[root@airflow2 sqlite-autoconf-3290000]#
#将路径传递给共享库
# 设置开机自启动执行,可以将下面的export语句写入 ~/.bashrc 文件中,如果如果你想立即生效,可以执行source 〜/.bashrc 将在每次启动终端时执行
(blog) [root@iZwz906mxhbe3mpxy6kyzoZ ~]# export LD_LIBRARY_PATH="/usr/local/lib"
# 检查Python的SQLite3版本
(blog) [root@iZwz906mxhbe3mpxy6kyzoZ ~]# python3
Python 3.6.5 (default, Nov 8 2019, 11:56:20)
[GCC 4.8.5 20150623 (Red Hat 4.8.5-39)] on linux
Type "help", "copyright", "credits" or "license" for more information.
>>> import sqlite3
>>> sqlite3.sqlite_version
'3.27.2'
>>> exit
Use exit() or Ctrl-D (i.e. EOF) to exit
>>> exit() |
|---|
报错2: sqlite C library version too old
[airflow@airflow1 ~]$ airflow -h
Traceback (most recent call last):
File "/home/airflow/.local/bin/airflow", line 5, in <module>
from airflow.__main__ import main
File "/home/airflow/.local/lib/python3.9/site-packages/airflow/__init__.py", line 34, in <module>
from airflow import settings
File "/home/airflow/.local/lib/python3.9/site-packages/airflow/settings.py", line 35, in <module>
from airflow.configuration import AIRFLOW_HOME, WEBSERVER_CONFIG, conf # NOQA F401
File "/home/airflow/.local/lib/python3.9/site-packages/airflow/configuration.py", line 1129, in <module>
conf.validate()
File "/home/airflow/.local/lib/python3.9/site-packages/airflow/configuration.py", line 224, in validate
self._validate_config_dependencies()
File "/home/airflow/.local/lib/python3.9/site-packages/airflow/configuration.py", line 277, in validateconfig_dependencies
raise AirflowConfigException(
airflow.exceptions.AirflowConfigException: error: sqlite C library version too old (< 3.15.0). See
帮助文档:
https://www.jianshu.com/p/4586aa8e5524
https://airflow.apache.org/docs/apache-airflow/2.2.4/howto/set-up-database.html#setting-up-a-sqlite-database
解决操作:
要在环境变量配置好这个 ~/.bashrc
export LD_LIBRARY_PATH=/usr/local/lib:$LD_LIBRARY_PATH |
|---|
报错3: sqlite C library version too old
安装pip3 install 'apache-airflow[apache.hive]'
第一个
creating build/temp.linux-x86_64-3.9/sasl
gcc -pthread -Wno-unused-result -Wsign-compare -DNDEBUG -g -fwrapv -O3 -Wall -fPIC -Isasl -I/usr/local/include/python3.9 -c sasl/saslwrapper.cpp -o build/temp.linux-x86_64-3.9/sasl/saslwrapper.o
gcc: error trying to exec 'cc1plus': execvp: No such file or directory
c
[end of output]
note: This error originates from a subprocess, and is likely not a problem with pip.
error: legacy-install-failure
× Encountered error while trying to install package.
╰─> sasl
note: This is an issue with the package mentioned above, not pip.
hint: See above for output from the failure.
解决操作:
root用户下执行
yum install gcc-c++
第二个
creating build/temp.linux-x86_64-3.9/sasl
gcc -pthread -Wno-unused-result -Wsign-compare -DNDEBUG -g -fwrapv -O3 -Wall -fPIC -Isasl -I/usr/local/include/python3.9 -c sasl/saslwrapper.cpp -o build/temp.linux-x86_64-3.9/sasl/saslwrapper.o
In file included from sasl/saslwrapper.cpp:629:0:
sasl/saslwrapper.h:22:23: fatal error: sasl/sasl.h: No such file or directory
#include <sasl/sasl.h>
^
compilation terminated.
error: command '/bin/gcc' failed with exit code 1
[end of output]
解决操作:
root用户下
yum install gcc-c++ python-devel.x86_64 cyrus-sasl-devel.x86_64 -y |
|---|
报错4: error: subprocess-exited-with-error
安装 pip3 install 'apache-airflow[mysql]'时候
Preparing metadata (setup.py) ... error
error: subprocess-exited-with-error
× python setup.py egg_info did not run successfully.
│ exit code: 1
╰─> [16 lines of output]
/bin/sh: mysql_config: command not found
/bin/sh: mariadb_config: command not found
/bin/sh: mysql_config: command not found
Traceback (most recent call last):
File "<string>", line 2, in <module>
File "<pip-setuptools-caller>", line 34, in <module>
File "/tmp/pip-install-kqrwdx09/mysqlclient_776e20b73c854434b22bd85667b15df6/setup.py", line 15, in <module>
metadata, options = get_config()
File "/tmp/pip-install-kqrwdx09/mysqlclient_776e20b73c854434b22bd85667b15df6/setup_posix.py", line 70, in get_config
libs = mysql_config("libs")
File "/tmp/pip-install-kqrwdx09/mysqlclient_776e20b73c854434b22bd85667b15df6/setup_posix.py", line 31, in mysql_config
raise OSError("{} not found".format(_mysql_config_path))
OSError: mysql_config not found
mysql_config --version
mariadb_config --version
mysql_config --libs
[end of output]
note: This error originates from a subprocess, and is likely not a problem with pip.
error: metadata-generation-failed
解决操作:
yum install mysql-devel |
|---|
报错5: Global variable explicit_defaults_for_timestamp needs to be on (1) for mysql
airflow db init 的时候
context.run_migrations()
File "<string>", line 8, in run_migrations
File "/home/airflow/.local/lib/python3.9/site-packages/alembic/runtime/environment.py", line 851, in run_migrations
self.get_context().run_migrations(**kw)
File "/home/airflow/.local/lib/python3.9/site-packages/alembic/runtime/migration.py", line 620, in run_migrations
step.migration_fn(**kw)
File "/home/airflow/.local/lib/python3.9/site-packages/airflow/migrations/versions/0e2a74e0fc9f_add_time_zone_awareness.py", line 44, in upgrade
raise Exception("Global variable explicit_defaults_for_timestamp needs to be on (1) for mysql")
Exception: Global variable explicit_defaults_for_timestamp needs to be on (1) for mysql
解决操作:
select user,Super_priv from mysql.user;
update mysql.user set Super_priv='Y' where user='root';
show global variables like '%timestamp%';
select * from mysql.user where user='root';
这个报错:
set global explicit_defaults_for_timestamp = 1;
执行失败,失败原因:Access denied; you need (at least one of) the SUPER privilege(s) for this operation
修改explicit_defaults_for_timestamp的参数, 不要使用sql的方式, 在rds的页面上找到“参数修改”选项, 在这里修改 |
|---|